One day, I’d like to be presented with a room where I can design the perfect kitchen. A kitchen with no compromises, with doors and windows in the right place to flood the room with natural light, drains where I need drains to be, dimensions that allow me have the optimal layout for both cooking and entertaining.
I know that day will never come. The reason is simply that “perfect” is subjective and design has to be a balance between our needs and goals. Here’s an example:. Ideally the things we use most want to be between waist and shoulder height. Obviously this is where our worktops are and we need that area to prepare food. An oven at this level is easier and safer to use. Finding items in the fridge is easier at this level than if you have to stoop and look below waist level. Also in that space is our hob and sink.
If we assume a
- sink is 1m wide,
- a hob is 0.6m wide but needs at least 0.3m either side, so call it 1.2m wide
- an oven is 0.6m wide
- a standard built in fridge is 0.6m wide
- a cosy 1.2m for all of your food preparation, dishing up and space to put things down when removed from the oven.
then already I need 4.6m of wall length. I haven’t even spoken of how dry food storage is also nice to have in our no-need-to-bend layout and this is before I consider things like the ideal distance between hob and sink (for filling pans with water) or proximity of clear surfaces to fridge, ovens and hobs.
However, we still aspire to create the perfect design even if perfect is a unique balance for each customer and the constraints of their room. Over the years I’ve developed a strategy to optimise designs and solve problems. I’m sure my strategy is not unique and maybe there’s a proper academic name for it, but either way I’ll share that technique now and a real world example of how I used it recently in both the design stage of a room and to solve an on site problem that only came to light during installation.
Firstly, Strategy.
1) Always understand the aim.
I learnt this through personal experience whilst I was a young teenage Air Cadet leading my fellow cadets on an initiative exercise. We had the role of a group of soldiers escaping from the enemy airfield we had just successfully attacked.. Safety was the other side of a fictitious river marked by two ropes. Here’s a pile of equipment (oil drums, timber, rope). You have about 15 minutes before you’ll be attacked. GO!!
Instinctively I asked. “Can we swim?”. It turned out that was the right answer. The equipment was there as a diversion but was not required for us to cross our fictitious river. From that experience I’ve remembered to always try and focus on what the objectives actually are and not assume things.
There are often multiple aims though. In my cadet experience having given the simple solution the aim got changed “now, you have 14 minutes to cross and you must take at least 2 plans of wood with you and you mustn’t touch the ground between the ropes which is now shark infested custard”.
To help identify the aims in a kitchen we think about the primary and secondary uses of a space. For example: Everyone one prepares meals in a kitchen but how many people are you cooking for? Will you ever need to put out 5 plates whilst dishing up or are there only ever 2 people serve. the difference changes answer to ‘how much countertop do I need?’
2) Understand the parameters of the environment, both it’s limitations and opportunities.
There are always limitations. Earlier I spoke about the length of a kitchen which is always complicated by the dimensions of the actual room or where windows and doors are. Sometimes we have an opportunity can move them but that often comes across the obvious limitation – cost.
In my cadet experience, the parameters then were “river” and “soldiers”. I figured soldiers would be fit enough to swim and we would be safe on the other side of the river, so swimming was a simple and effective solution to the immediate problem.
In kitchen design though, we often want to look further ahead. Not crossing walkways with hot things is important today if you have children but even if you don’t will grandchildren or children of friends be visiting? We always try to keep the hob and sink on the same side of the kitchen and not crossing any walkways through the room. The ideal of safe in the future also extends to maintenance. If you have an extractor mounted in the ceiling how will you reach the filters to remove and clean them?
Whilst I don’t have a cadet experience of thinking ahead in problem solving I do remember speaking with my granddad about evacuating from France in the war. He was an army lorry driver and when evacuating from Dunkirk had to leave his lorry behind ‘suitably disabled’ so it couldn’t be repaired and used by the advancing German army. His life story is here in case you’re interested.
Real world example
So if all I’m doing is trying to understand the aim and understand the parameters can I show you an example of how this works in real kitchens?
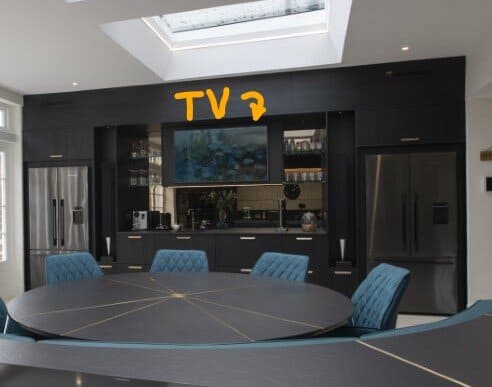
A recent kitchen design (see the full kitchen reveal on our youtube channel) included the requirement for a large screen TV in the room. That is simple enough and I’d found an effective position for it, aesthetically pleasing being the centre of a wide run of furniture and easily viewed from the seating area in the room. The TV chosen was a Samsung Frame which is thin and fits close to the wall.
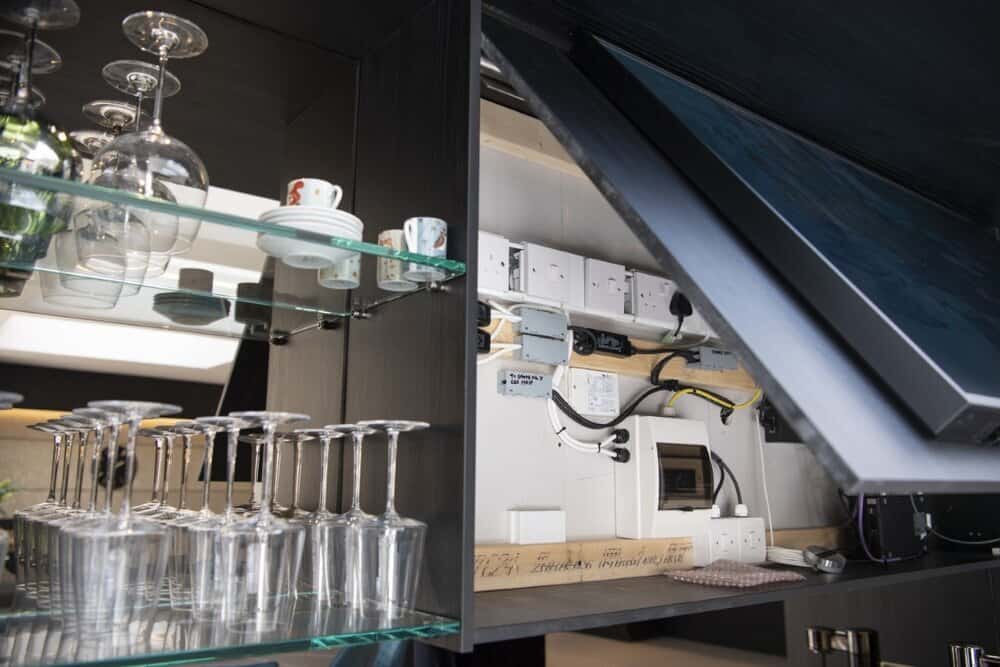
So far, so good. But we’re perfectionists and thinking of the parameters I realise that with a TV you often need to plug devices in and out. I wanted to make this as easy as possible for the future. The TV couldn’t be mounted on a pull out arm as by design it fits flush to the wall, so what could I do?
I’d already planned to mount the TV forward from the wall on furniture for aesthetics so now I worked out how to make the whole panel it was fitted to a hinged opening panel. The size of the panel without the TV already ruled out using conventional concealed cabinet hinges but I worked out that 3 butt hinges (as used for internal doors) could safely and effectively carry the weight. I had to calculate the fixing positions and consider how the whole panel moved so it wouldn’t clash with other parts as it opened.
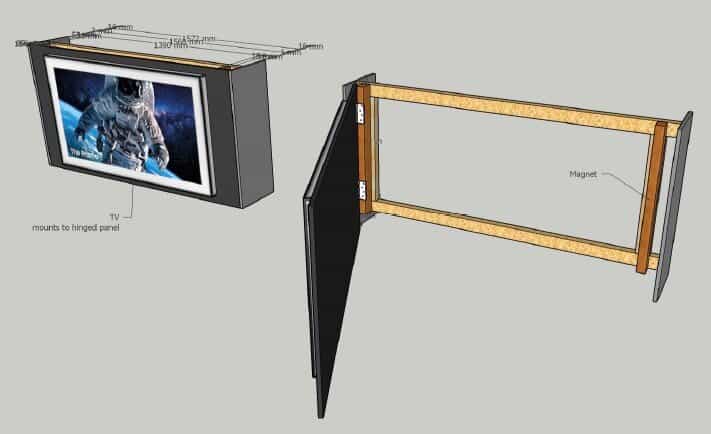
Using 3D models I could manually reposition parts to check for clashes. 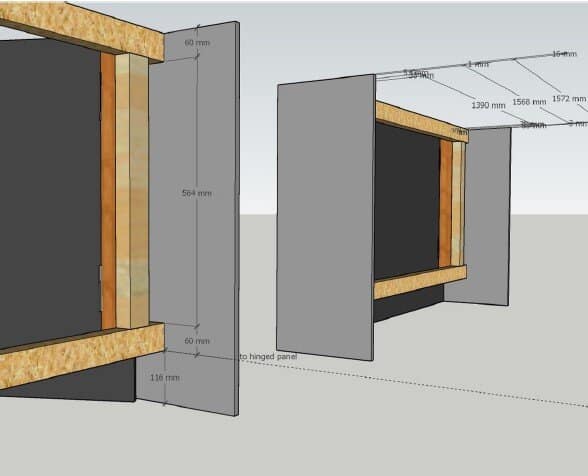
The 3D models also formed part or our installation pack with full assembly instructions for our carpenters.
This was a great plan, until we were fitting the kitchen and the carpenter noticed the wall was flexing. The new wall had been built by the builders in aluminium studwork with plasterboard over. Normally this isn’t a problem but my design had all the weight carried on one side of the unit and concern was raised over whether the studwork was rigid enough to support it.
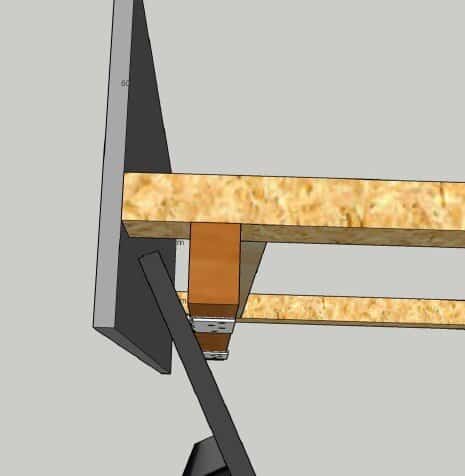
Back to problem solving mode, the aim remained to allow access behind the TV but the parameters had changed. The wall wasn’t strong enough so what could we do? One option was to rebuild the wall, another was to baton across the wall to make it stronger and move our units forward (which would have caused other problems). The option we selected was for me to design a new type of hinge and have it fabricated by our metal workers. Rather than support the panel on one side I had a bar made to fit across the whole space. We had wide hanging hook-plates made that fixed to the panel. I designed the position of the bar such that the panel can be put in place horizontally and lowered onto the bar making connection easy.
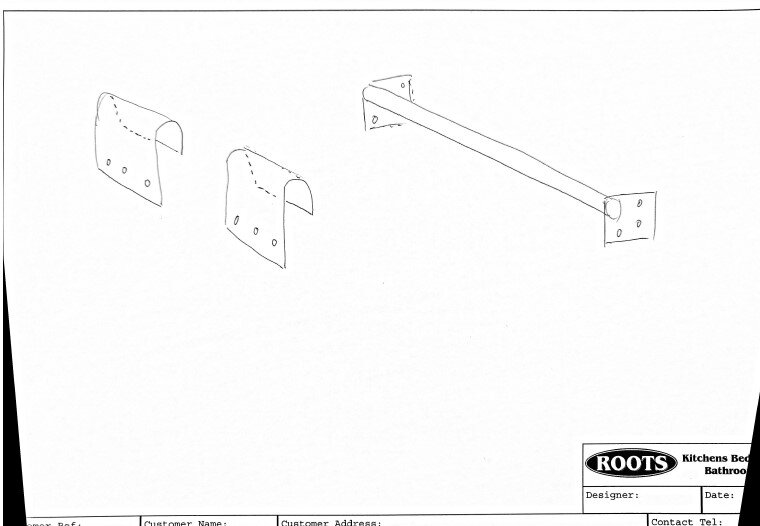
The initial idea sketch I discussed with our carpenters and metal fabricators 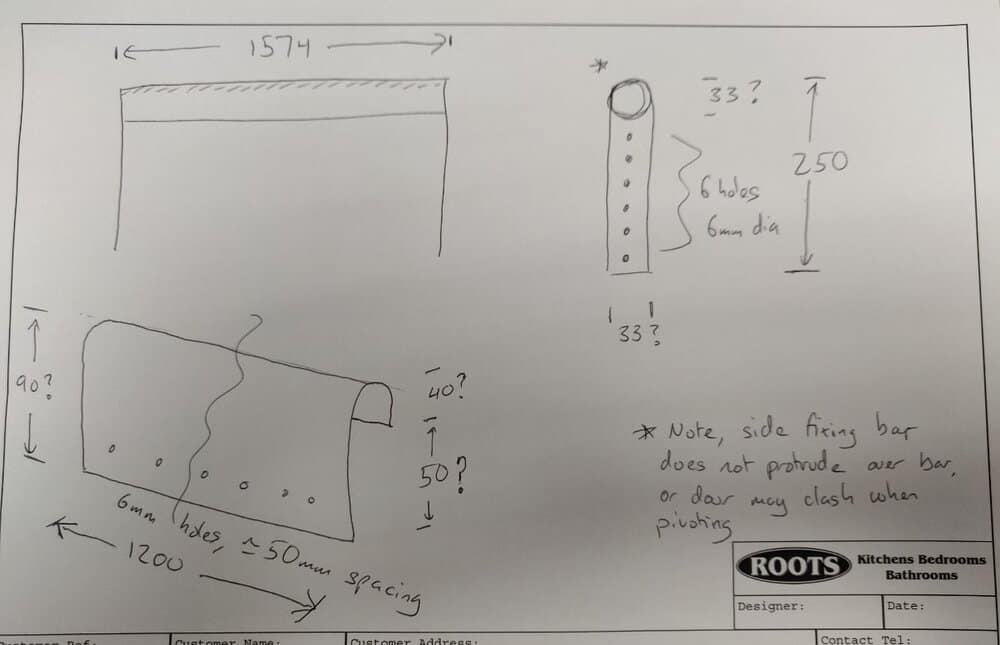
A more detailed version used for pricing with accurate measurements. A lot of our bespoke design and problem solving includes considering the fabrication methods. For example id designing these parts the fabricators were able to advise on material they had in stock (33mm diameter stainless steel tube) and the single 1200mm wide hook became 3 pieces of around 250mm each to make fabrication easier and cheaper.
The new hinge turned out to be better than the original design. The space behind the TV not only allowed for easier connection and disconnection of media devices but provided a place for other trades to make their connections too